
اگر هیاهوی یک دفتر یا خانه شلوغ به تجربه ویرایش صوتی شما آسیب می رساند, پس توجه کن!
نویز پسزمینه میتواند بهویژه برای یک تجربه ضبط بهینه مضر باشد. تشخیص اینکه کدام صدایی را می شنوید ممکن است دشوار باشد, بنابراین حتی اگر فقط پچ پچ پس زمینه یا صداهای دیگر از منطقه اطراف باشد – مانند ترافیک جاده ای یا واحدهای تهویه مطبوع هوابرد – اینها به طور بالقوه می توانند صدای شما را غیرقابل استفاده کنند!
1. کمربندهای ایمنی خود را ببندید و سطوح خود را تنظیم کنید
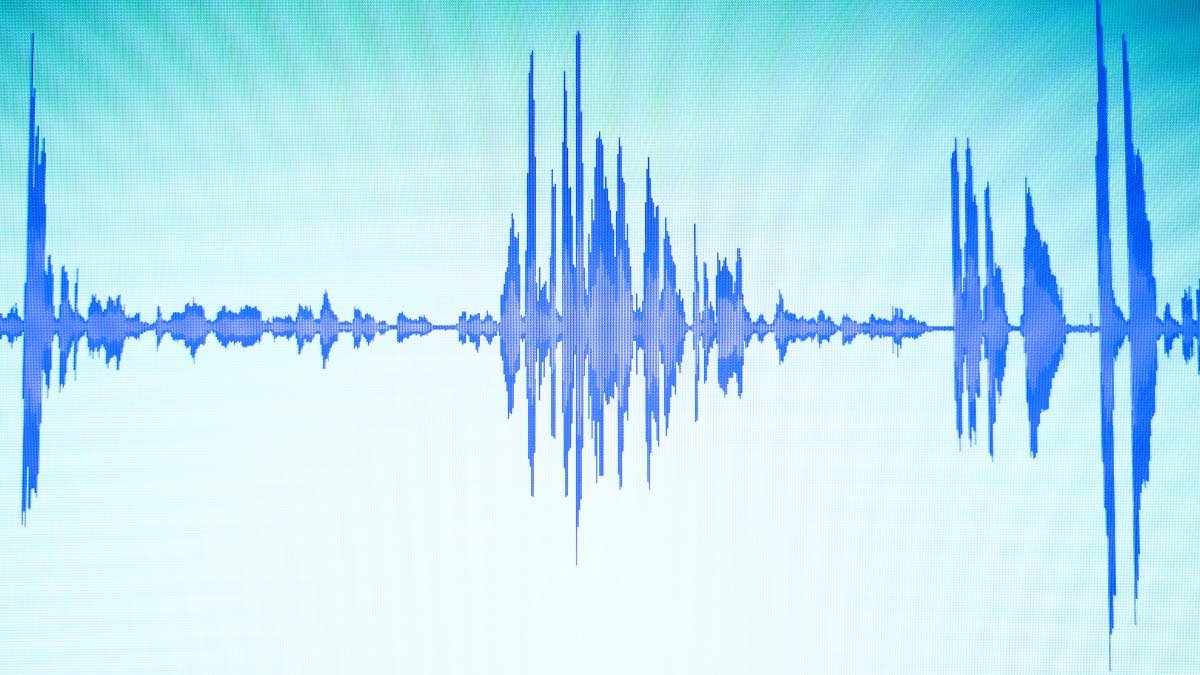
اگر به دنبال حذف نویز پس زمینه در یک آهنگ هستید, ضروری است که صدای صحیح را تنظیم کنید و هرگونه نوسان را برطرف کنید. برای انجام این کار, از ماوس خود استفاده کنید – به سادگی یک بار در مرکز آهنگ خود در حالی که SHIFT را نگه دارید کلیک کنید تا در حین لغزش نوار لغزنده به بالا یا پایین ثابت بماند.. در مورد پاک کردن مسیرها نگران نباشید; اگر می خواهید بعداً ویرایشی انجام دهید و قبل از ادامه، آنها را ذخیره کنید!
هنگامی که سطح ایده آل را برای هر دو کانال ایجاد کردید, مطمئن شوید که با مقداردهی اولیه سطوح شما هیچ نویز اضافی وارد نشده باشد (نکته را ببینید #1 بالا).
با سطوح شما به درستی تنظیم شده است, تنها چیزی که باقی می ماند این است که آن دستگیره های تنظیم دقیق را تنظیم کنید! اگر می خواهید بشنوید که تنظیمات صدای شما چقدر بر نتیجه نهایی آهنگ شما تأثیر گذاشته است، روی "Scope" کلیک کنید.’ دکمه واقع در پایین گوشه سمت چپ; پس از آن به ناحیه مورد نظر فایل صوتی خود بروید و شکل موج مربوط به آن را مشاهده کنید.
2. در جنگل های بادگیر گم شوید
اگر از علاقه مندان به طبیعت هستید, چرا از این محیط باشکوه استفاده نکنید? این را می توان به سادگی با استفاده از "ابزار حرکت" انجام داد’ تا ضبط خود را از موقعیت اولیه به منطقه ای با خلوت بیشتر و موانع کمتر منتقل کنید.
برای ایجاد یک محیط بادی وودز, با قرار دادن میکروفون خود در مقابل خود به گونه ای شروع کنید که گویی در هنگام سحر زیر سایه بان ایستاده اید. سپس «انتخاب ابزار» را انتخاب کنید’ در پایین نوار ابزار شما قرار دارد; در صورت تمایل، از هر انتخاب مرتبط دیگری استفاده کنید.
از ابزار حرکت استفاده کنید تا ضبط خود را به مکان بهینه برای ضبط روایت باد منتقل کنید. شما می توانید بین اهداف مختلفی مانند ایجاد یک صحنه شلوغ یکی را انتخاب کنید (مانند زیر یک آزادراه), یا صرفاً طولانی کردن آن برای یک تجربه موجی – همه در دسترس!
3. در اتاق گودال بازی کنید
برای ساختن یک منظره صوتی کامل, شما باید محیط را نیز در نظر بگیرید. این را می توان از طریق تکنیک های صوتی فضایی مانند ضبط دو گوش و IEM به دست آورد – که یک روش عالی برای گوش دادن به موسیقی در مکان های شلوغ مانند فرودگاه ها یا حمل و نقل عمومی است.
برای مثال, استفاده از IEM با روشنکردن جلوه طنیندار ممکن است تجربهای نزدیکتر به حضور در یک اتاق خالی جادار نسبت به رفتوآمد معمولی شما با هدفونهای هدفون ایجاد کند.! هر چند از طرف دیگر – آنها همچنین می توانند نتایج غیرمنتظره ای به همراه داشته باشند اگر در مورد تنظیمات مختلف آشپزخانه صحبت کنیم، جایی که انعکاس صدا ممکن است به خوبی به ایجاد یک ترکیب عجیب و غریب کمک کند.!
4. سفری بدون نام داشته باشید
بعد از یک روز پیاده روی طولانی, ممکن است لازم باشد که نشخوار فکری خود را با یک چرت آرام آرام خاموش کنید. اما قبل از رفتن به خواب, چرا یک اکسپدیشن زیر شکوهمندترین صخره های جهان راه اندازی نکنید?
مهم نیست که ماجراجویی انتخابی شما چه خواهد بود, این احتمال وجود دارد که طبیعت بتواند آرامش ترمیمی بسیار مورد نیاز را فراهم کند. چیزی در مورد غوطه ور شدن در طبیعت وجود دارد که ذهن را از نگرانی های روزانه اش رها می کند - حتی برای یک لحظه!
5. از سایه خارج شوید
آیا تا به حال فکر کرده اید که چرا برخی از آهنگ ها اینقدر صیقلی به نظر می رسند, در حالی که دیگران در اطراف لبه ها کمی خشن به نظر می رسند? ممکن است به این دلیل باشد که فرآیند اختلاط با نمونه قبلی سختتر بود; همه چیز به نوع تجهیزات مورد استفاده برای هر مسیر خلاصه می شود.
اگر میکس شما از چندین ساز تشکیل شده است, مانند گیتار و آواز, سپس انتخاب مناسب ترین تجهیزات بسیار مهم می شود. خود را موظف به استفاده از تقویت کننده های سبک قدیمی نکنید – اگر آنها برای سبک موسیقی یا طبقه بندی ژانر شما مناسب نیستند, سپس به آنچه که بهترین کار را می کند، بمانید!
نکته اصلی این است که سخت افزار می تواند بر کیفیت صدا تأثیر بگذارد, که در نهایت می تواند به میکس هایی با صدای بهتر منجر شود.
6. برای جاروبرقی هیجان زده شوید
از میکروفون حرکت کنید, و ما خود را در محیطی کاملا متفاوت می یابیم – فضای کار شما. اگر به دنبال شغلی هستید یا به سادگی می خواهید یک قسمت پادکست را در خانه بسازید; سرمایه گذاری در جاروبرقی را در نظر بگیرید!
این دستگاه قدرتمند برای از بین بردن نویزهای ناخواسته مانند صداهای ایستا یا پارگی، واقعاً در زمان صرفه جویی می کند.. فقط آن را روی خلبان خودکار تنظیم کنید و اجازه دهید تا زمانی که مشغول به کار هستید کار خودش را انجام دهد!
7. مکانی برای غرق شدن یا شناور شدن پیدا کنید
اگر هنگام شنیدن صداهای مزاحم در محیط، تمرکز بر روی کارتان برایتان دشوار است, سپس به خرید یک اتاق مجزا برای بهره وری فکر کنید.
اگر انزوا امکان پذیر نیست, تحقیقات نشان میدهد که شناور شدن یا فرو رفتن در حمام میتواند پس از مدتهای طولانی گوش دادن به محیط پر سر و صدا، تمرکز آرامی داشته باشد..
نتیجه
برای حذف نویز پس زمینه از ضبط های خود, با اطمینان از اینکه آنها از همه صداها و صداهای دیگر آزاد هستند شروع کنید. سپس, از ابزار یکسان سازی برای تقویت فرکانس های کلیدی و در عین حال کاهش همزمان صداهای سطح پایین استفاده کنید.; این باعث ایجاد یک منظره صوتی جادارتر می شود.

