
![You are currently viewing Voicemail not working on iPhone? [Daws tau yooj yim]](https://toolpub.com/wp-content/uploads/2021/11/jason-goodman-BAanEbxe9No-unsplash-scaled.jpg)
Voicemail is the oldest popular technology to send a voice message. Many people still use this message system in their busy life to send a quick response. Sometimes Voicemail does not work on iPhone properly, and it stops quickly. Many iPhone users report this bug. It could happen due to a system update, transcript issue, or another reason.
Many iPhone users are dependent on the default voicemail system, and they don’t want to use a third-party voicemail service such as WhatsApp, Messenger, and other apps.
If you also find a solution for this mysterious issue, then relax your mind. Here we provided the working solution to fix Voicemail not working on iPhone issue. Try every tip to solve the bug instantly. I assured most of the users solved the problem with this guide. So read the post carefully and follow the steps to opt-out of this bug.
Kev daws teeb meem 1: Reboot your iPhone
Reboot the phone can fix many problems by restarting your phone. When the system restart, all app start again, so reboot may fix that issue.
You might be surprised, but it’s working in many cases. Because the operating system may not load fully sometimes, that’s why you have to face these types of errors.
Kev daws teeb meem 2: Restart the Voicemail app
Due to a Software bug or issue, the app is not working correctly. You have to reopen the application again.
To do this process, drag your finger bottom to the center and hold until the task manager is popup. Once you find the voicemail app, close it and restart it again from fresh. The issue about Voicemail tsis ua haujlwm ntawm iPhone 13 is solved.
Kev daws teeb meem 3: Restart the Cellular Network
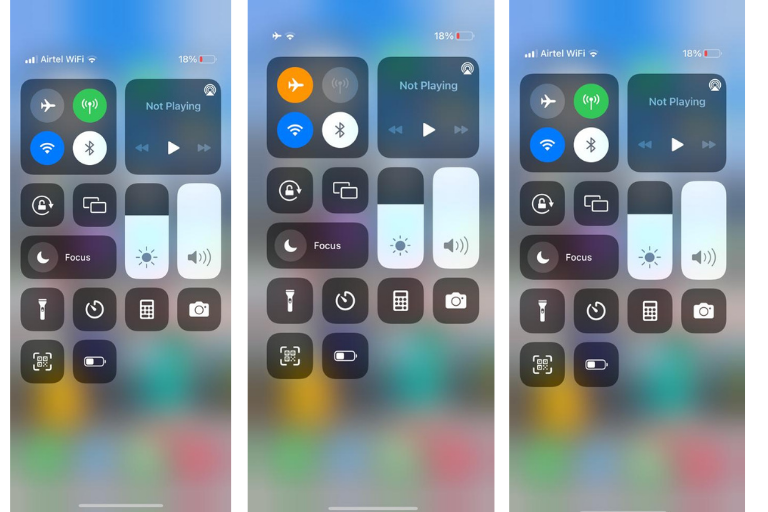
You can Restart the cellular network through Aeroplane mode. Airplane mode is located in the widget bar.
- Drag your finger from up to down to access the airplane, and the widget bar will appear on the screen.
- Please tap on the Airplane icon to enable it. It will turn in orange color.
- Now disable it after 1 minute to again start your cellular network. This tip is helpful to fix issues with Voicemail.
Kev daws teeb meem 4: Configure the Voicemail Setup
If you are using the voicemail service for the first time, it is necessary to set up the voicemail setting. Kuj, when you update your phone, the update may change the configuration settings after updates. So always take a look at your locations.
You can watch the configuration by following through the Phone > Voicemail app.
Kev daws teeb meem 5: Update iOS Operating system
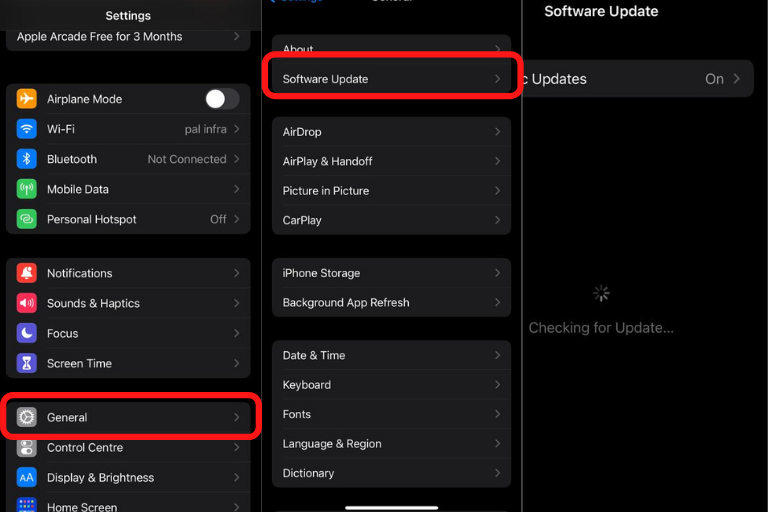
iPhone constantly improves the Operating system to fix bugs and patches for security reasons. So please make sure that your phone is updated with the latest operating system.
To check the system update, go to Setting> General > Software Update > Update the system
if you are already using the latest system, then you will see nothing to update.
Kev daws teeb meem 6: Automate Timezone and Date
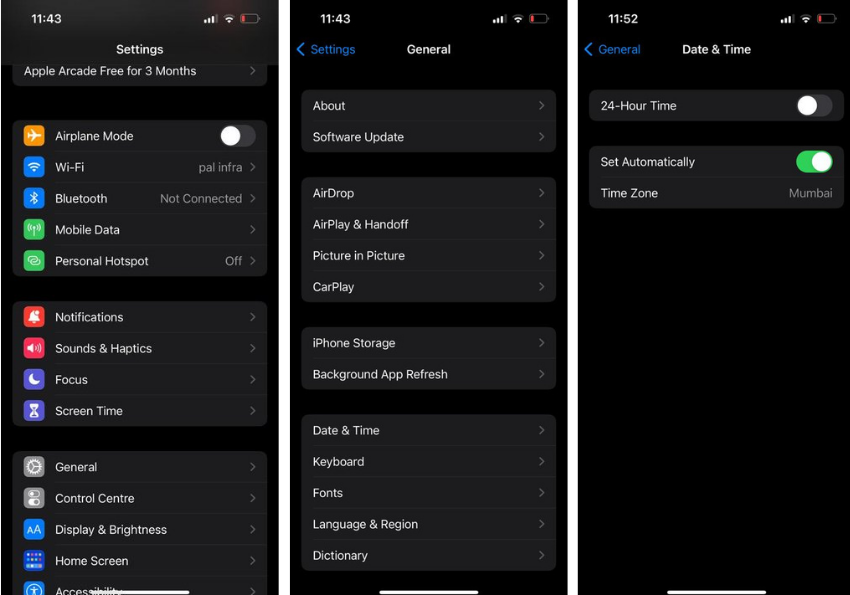
Using the Automatic timezone option is recommended to set the current date and time according to your location. Because incorrect time may stop you from using some service, always go for the automatic time zone option. to enable this option Go to setting > General > Date & TIme > Set Automatically and enable the option.
After enabling this option, please check the time and date to ensure that it is correct or not?
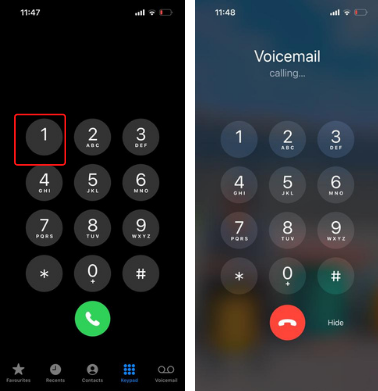
Kev daws teeb meem 7: Test your voice call by calling directly
Call to listen to your voicemail messages to check it is working correctly. To prevent your Voicemail, follow the below steps.
- Open Phone Dialpad
- Press one and hold it for a second.
- The voicemail dial automatically.
After listening to your voicemail messages and identifying the issue, you can fix the problem by configuring the Setting.
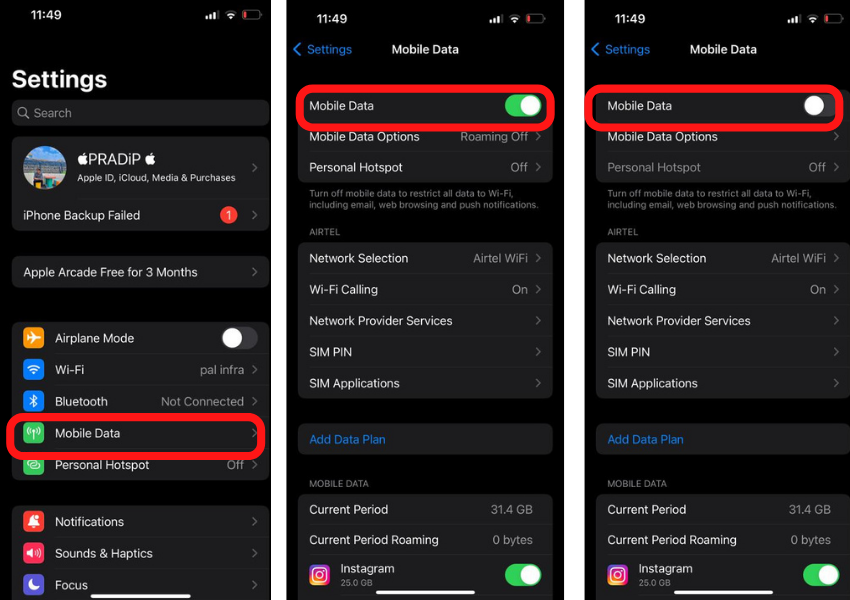
Kev daws teeb meem 8: Disable Cellular Data
You can Switch the Cellular Data option to fix the Voicemail issue on iPhone.
Go to Setting and Tap on Mobile Networks. You can see the Mobile cellular data option.
Toggle the mobile data to disable it. Wait for at least 1 hour and reenable mobile data. You can enable it again. This option also works to solve the mobile voicemail issue.
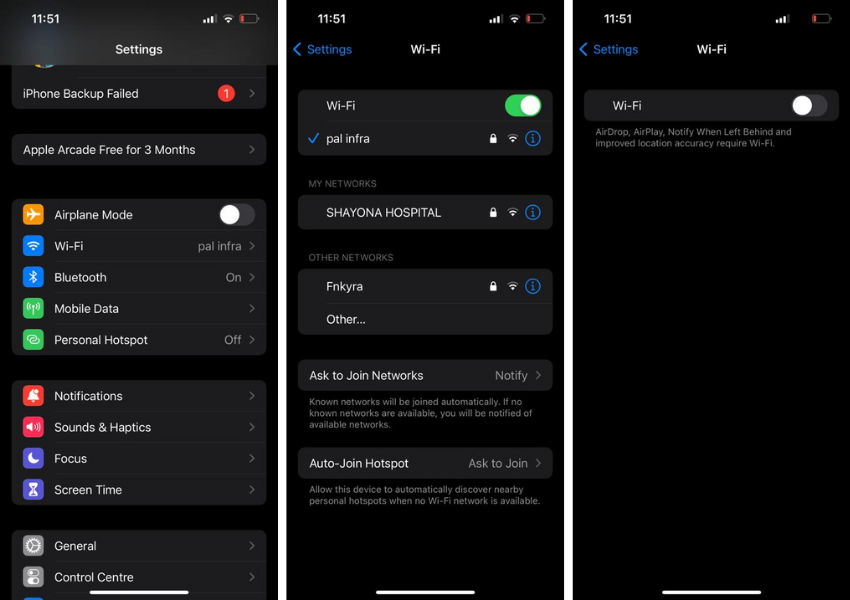
Kev daws teeb meem 9: Disable wireless connection
Disabling wi-fi connections may also solve your issue sometimes. So you can also try this option. you can disable it by following Setting> wi-fi> Disable the Wi-fi
tom qab ntawd, you can go for Voicemail.
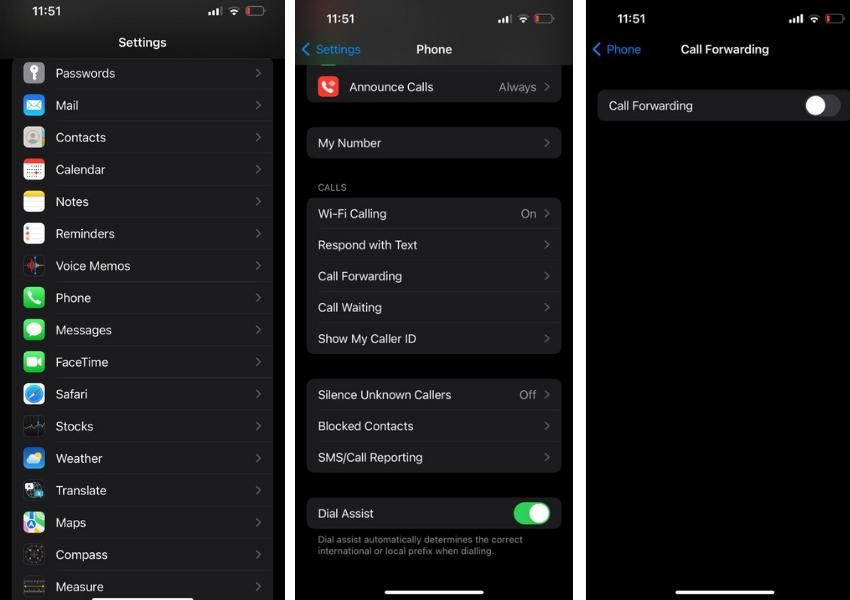
Kev daws teeb meem 10: Turn off Call Forwarding
If you have already set for call forwarding, then it might create the issue for sending Voicemail. So please make sure that the call forwarding option is disabled.
To check the status of this situation, you can go through Settings > Phone > Call Forwarding
Kev daws teeb meem 11: Update carrier settings
When an Update is released from the carrier Network, you will receive a message on your phone. You can install it directly from the configuration message. The system will automatically replace the new settings with old settings. You don’t have to do anything, tab sis koj rho tawm cov lus no thiab xav tshawb xyuas qhov hloov tshiab, tom qab ntawd koj tuaj yeem teeb tsa nws los ntawm tus neeg nqa khoom network chaw.
Koj yuav tsum ua raws li txoj kev no: Settings > General > Hais txog yog tias muaj dab tsi yuav tsum tau hloov, ces lub popup yuav tso tawm ntawm qhov screen hauv ob peb vib nas this. Koj tuaj yeem hloov kho nws, thiab yog tias tsis muaj dab tsi rau qhov hloov tshiab, koj tuaj yeem pom tsis muaj dab tsi ntawm no.
Kev daws teeb meem 12: Contact Carrier Support
Hu rau kev saib xyuas cov neeg siv khoom los daws qhov teeb meem no. Yog tias muaj ib yam dab tsi los hloov los kho qhov teeb meem, lawv yuav pab koj kom txog thaum daws teeb meem. Tej zaum cov no tuaj yeem tshwm sim ib cag ntawm lawv, thiab koj yuav tsum sim qhov no.
Kev daws teeb meem 13: Change Voicemail Password
Yog tias koj teeb tsa lo lus zais rau Voicemail, koj tseem tuaj yeem hloov lo lus zais los kho qhov teeb meem no. Koj tuaj yeem rov pib dua lo lus zais los ntawm kev nkag mus rau hauv nrog koj tus neeg nqa khoom profile. Yog tias koj tsis nco qab koj tus password, tom qab ntawd koj tuaj yeem tiv tauj koj tus neeg nqa khoom txhawb nqa cov neeg siv khoom.
Txhawm rau hloov lo lus zais, Koj tuaj yeem mus rau Settings > Phone > Change Voicemail Password
Kev daws teeb meem 14: Reinsert the Simcard
Reinserting lub SIM kuj daws tau qhov teeb meem voicemail. Thaum koj reinsert lub SIM, lub network tej chaw yuav hloov tshiab los yog pib dua rau lub neej ntawd tus nqi. Reinsert SIM card tshuab yuav kho tau ntau lub network teeb meem los ntawm qhov kev daws teeb meem no.
Kev daws teeb meem 15: Hoobkas pib dua
Yog hais tias koj sim tag nrho cov kev daws teeb meem tab sis tsis tau kho qhov teeb meem, koj yuav mus rau lub Hoobkas cov ntaub ntawv pib dua kev xaiv. Tom qab resetting koj lub xov tooj, tag nrho cov chaw hloov mus rau neej ntawd xaiv. Tab sis nws yuav lwv tag nrho cov ntaub ntawv. Txoj kev yog lub sij hawm haus thiab ntev.
Koj yuav tsum sim tag nrho txoj kev uas piav hauv qab no thiab khaws no tov raws li lub xeem resort.
Rov pib dua koj lub xov tooj mus rau Setting > General > Reset > Lwv tag nrho cov ntsiab lus
Kev daws teeb meem 16: Hu rau Apple Support
Koj yuav tiv tauj cov kua txhawb pab neeg kom tau ib txoj kev daws teeb meem no. Koj tuaj yeem tsa daim pib ntawm Apple Support, thiab lawv yuav teem sijhawm los daws qhov teeb meem. Koj tseem tuaj yeem mus rau lub khw muag khoom Apple Care ze tshaj plaws.
Kuv twv cov no yog cov kev daws teeb meem txaus los kho qhov teeb meem ntawm Voicemail tsis ua haujlwm ntawm iPhone. Yog tias koj muaj kev ua xyem xyav, Koj tuaj yeem tawm tswv yim nrog koj cov lus nug.
FAQs
Q. Vim li cas kuv lub suab xa ntawv tsis muaj nyob rau ntawm kuv iPhone?
Hauv kuv tsab xov xwm, Kuv tau piav qhia txhua qhov muaj peev xwm rau qhov teeb meem no. Koj tus neeg nqa khoom tsis tau teeb tsa rau lub suab xa ntawv, thiab, vim li cas qhov teeb meem no pops. Koj tuaj yeem kho qhov teeb meem no los ntawm kev teeb tsa koj tus neeg nqa khoom network nrog kev teeb tsa tsim nyog thiab chaw txawb.
Q. Kuv yuav ua li cas qhib voicemail ntawm kuv iPhone?
Mus rau Phone > Voicemail > Teeb tsa tam sim no > Teeb tsa Passcode
Nkag mus rau koj tus passwordcode thiab qhib qhov kev pabcuam Voicemail. Koj tuaj yeem teeb tsa koj cov kev cai txais tos rau voicemails. Nco ntsoov tias koj txoj kev npaj muaj xws li kev pabcuam voicemail.
Kev Xaus Lub Neej
Koj yuav kho tau cov teeb meem voicemail rau koj iPhone los ntawm restarting koj lub xov tooj, toggling dav hlau hom, cov ntaub ntawv, Wi-nkaus kev twb kev txuas, resetting lub carrier chaw, hloov kho lub iOS no system, resetting lub iPhone, thiab lwm yam kev daws teeb meem uas kuv piav qhia nyob rau hauv kev nthuav dav saum toj no. Koj yuav tiv tauj koj carrier kev them nyiaj yug los tham txog qhov teeb meem no.


